Left my AC200MAX charging over night, when I checked the unit the next morning the plug from the AC adapter had melted in the unit. Reached out to support to see if this is covered under warranty, still haven’t heard back from them.
Hi @gmen50 , Based on this situation, you need to contact support to return the machine and adapter. Also check the machine and adapter barcode (SN code) and inform the support department of the usage conditions
Assuming the unit was charging normally, I would think the plug and socket were not fitting tightly or not fully plugged in. This can cause resistance which will heat up connections. Could be an undersize plug on the adapter brick.
Right, this company support is the worse. Sent an email no response. You call, mailbox is full.
Hi @gmen50 , sorry for inconvenience caused. Support will respond to your emails, but the mailbox have been overloaded lately. The response time may not be timely. What is the email address you used to send your letter to our support department? And your order number. We will use this information to check with support to prioritize your issue.
1 Like
Had this same condition but did not melt completely. Using this type of plug for that high of watts is not the best option. The plug would not make good contact and would heat up but not to the extent of your unit. Did contact the company and they did replace the entire unit but it did take some time as I had to send the original unit back before they sent a new unit out but it did finally work out.
I sent my unit in and have emaied over and over to get a status update. To date i have not recieved a call or email from support .
Truly regret spending all this cash on this product. Support is so freaking bad.
Hi @gmen50 , can you please send me your order number or your email address ? So that I can check with support for you and have it processed for you as soon as possible.
I have this same problem. Used the AC200MAX daily with grid charging over a month and then the barrel plug melted. No response from email to service@bluettipower.com. Sent email 9 days and 3 days ago.
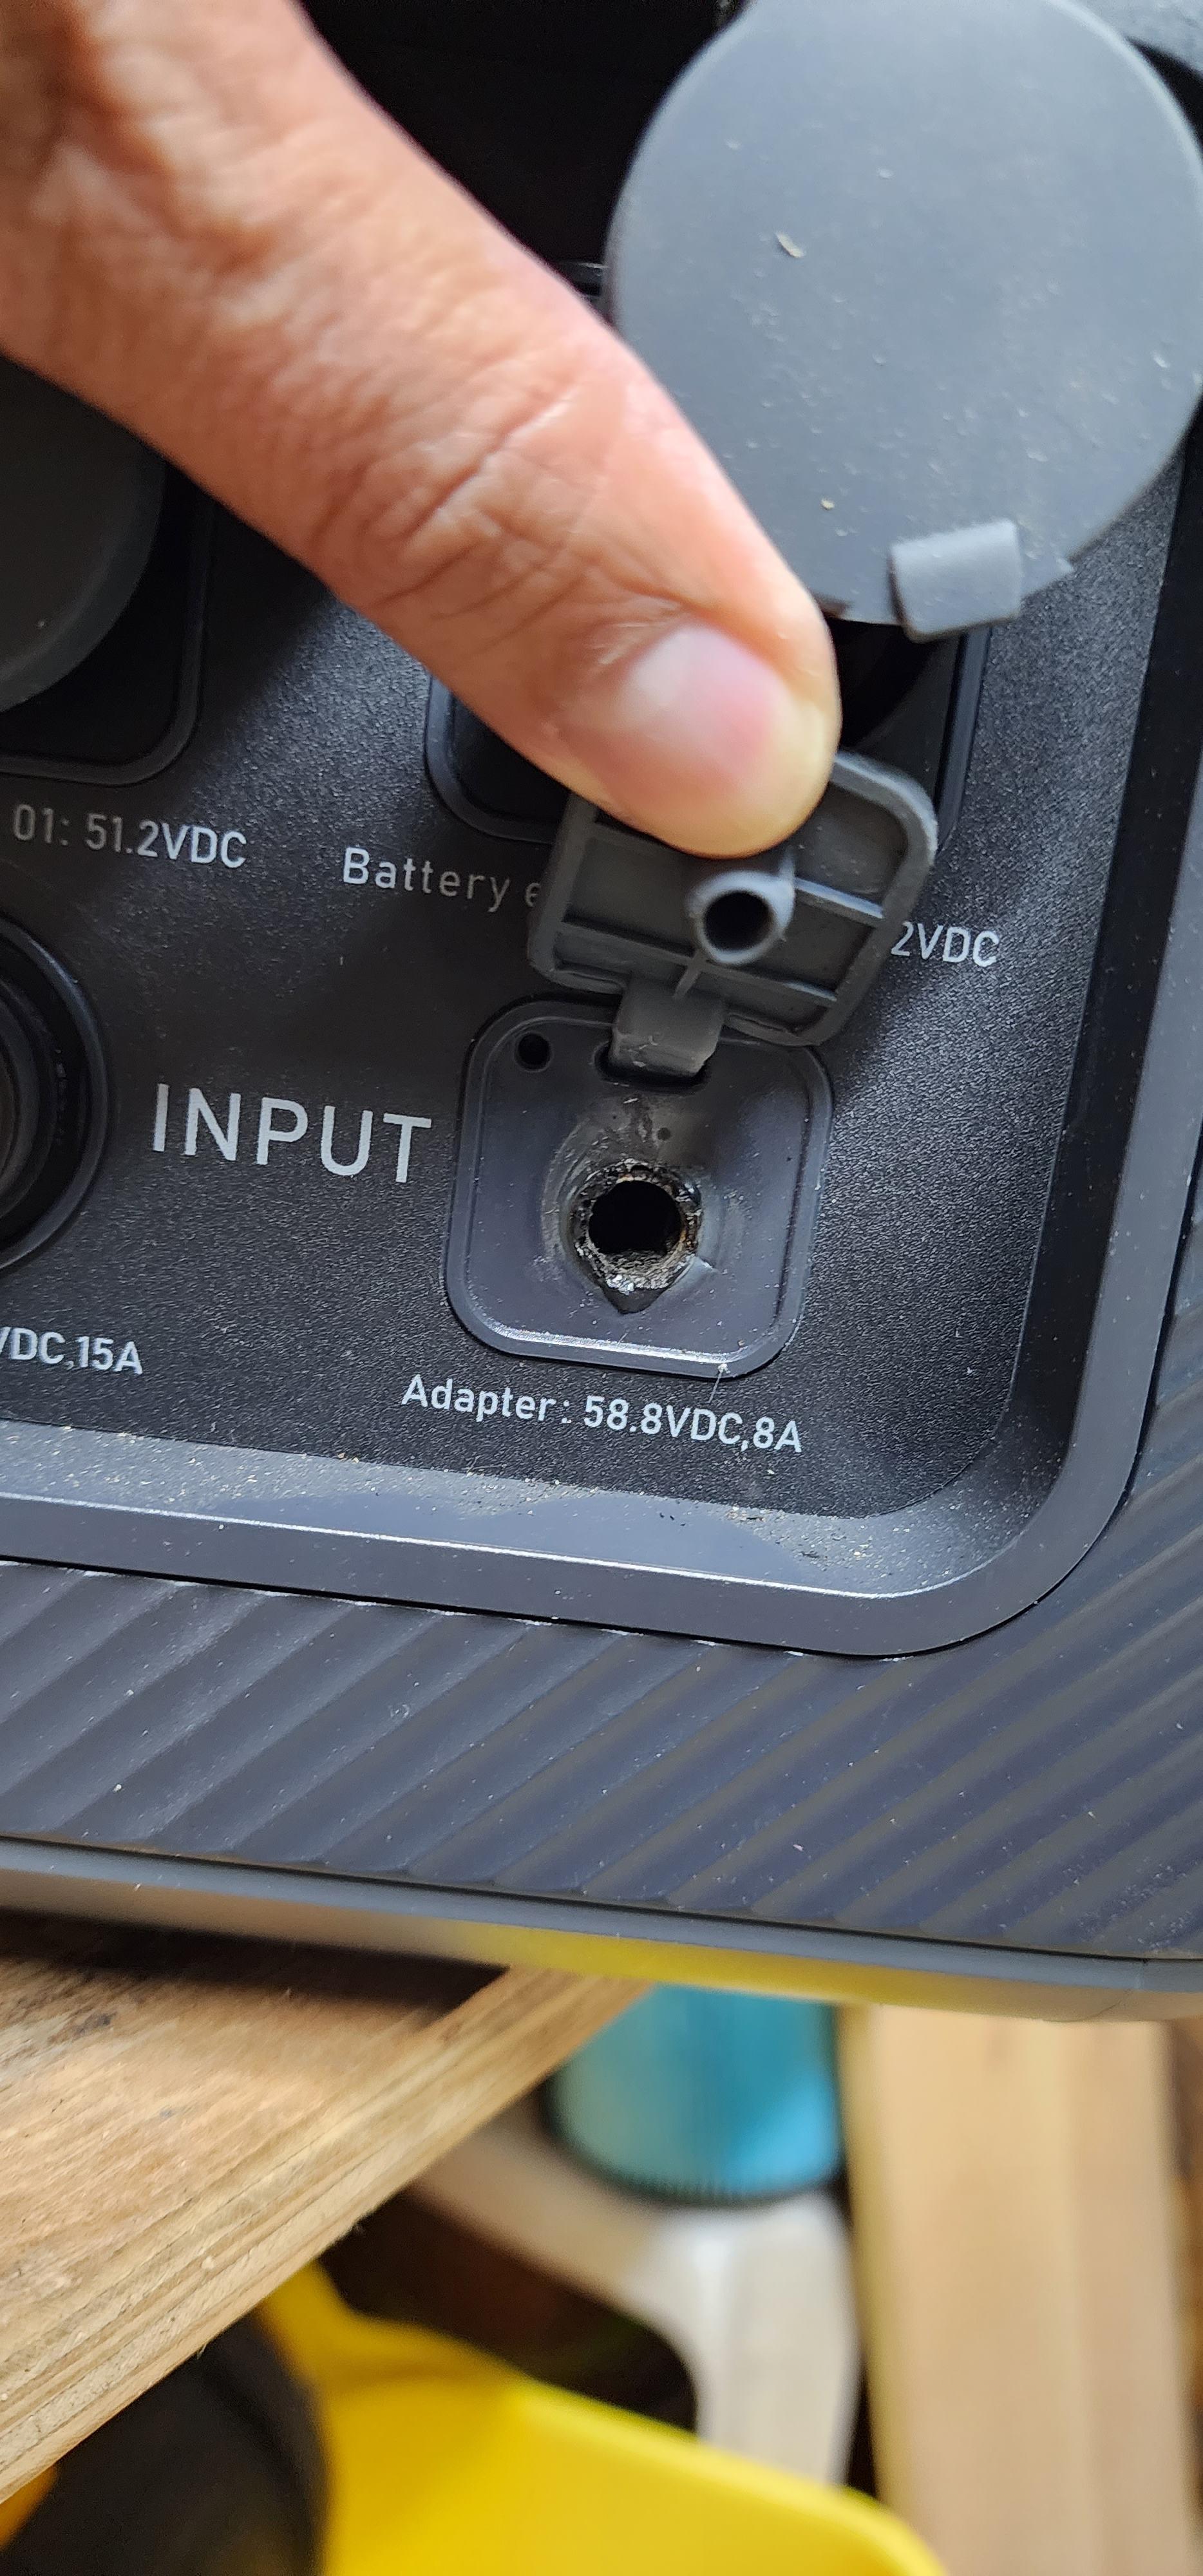
Same issued here! Plug and/or socket are inappropriate for the load. Bad construction. In my case you can see in the picture below that plug internal yellow/white plastic material was streaming out due to the heat of the physically inappropriate connectivity.
@buetti: please look for a workaround!

another remark: checked after one hour of grid loading at ~390W (this is what the display shows) also the complete cable from the grid adapter to the plug becomes warm in a room with 18°Celsius.
I still havent gotten a reply on my unit. Mine melted aswell. And would like a full refund.
Are you using the fanless t400 charger or the (with fan) t500? I’ve rarely used the grid and barrel charger on my ac200max, but with the t500 I see 450 - 475 watt charging input and no overheating issues.
On a side note, a while back I use to charge my eb70s with solar using the same 8mm barrel plug. When I had 2X 200 watt pv’s connected to it in parallel, I noticed it would get pretty hot to the touch. I had a small fan that I would aim at it. That kept the connection cool.
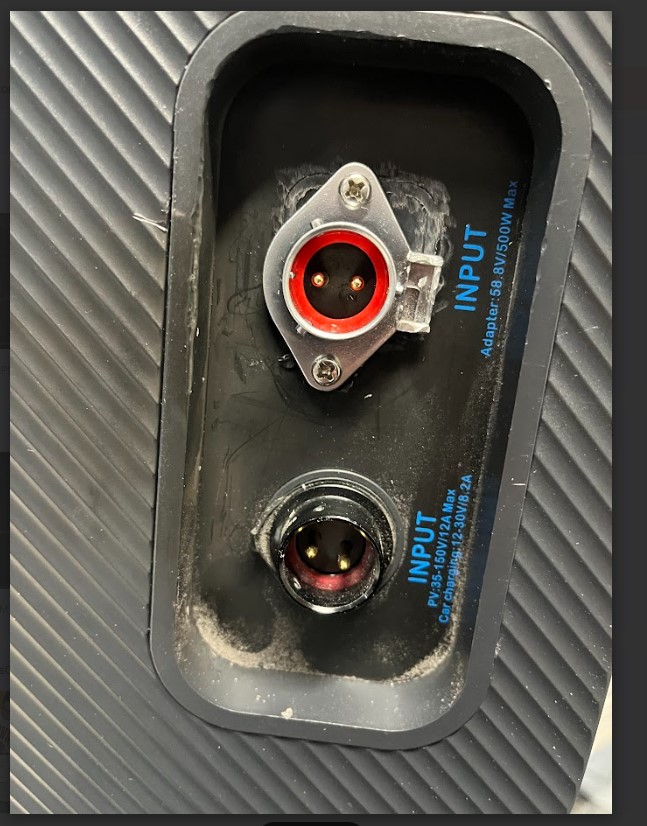
Same thing happened to me to my AC200P. The unit was sitting on my work bench charging, when I placed something nearby it, and I had not realized but it place a very slight amount of force on the side of the power cable/connector. It burned and melted and was not recoverable. I didn’t want the hassle of returning the unit, so I installed a ZBLZGP HP20 2 Pin Bulkhead connector I purchased on Amazon. The connector is rated for 30A @ 500v. The installation was fairly simple- I watched a Youtube video of a disassembly, and then used a Dremel to remove the internal plastic ribbing. Then it was only a matter of soldering the existing cable assembly to the connector. The connector also came with a mating cable mounted connector for the power supply. The unit is back together and working perfectly. If anyone needs any help, let me know. I’d be happy to help. I do believe that the original connector is marginal at best for a 8A charging current.
2 Likes
I think we can all agree that the 7909 plug and socket combination may not be the best choice for this application however the vast majority of plugs and sockets charge without overheating or issues. It has to be the connectors becoming loose or charging not fully plugged in that is the contributing factor.
This happened to my unit very early on and i too neglected to send it in. How did you do this? Any more tips or directions on the installation would be amazing!!! Thank You
No problem.
Besides basic tools to take the unit apart, you need a Dremel with a cutting wheel. I used a steel cutting wheel to smooth out the plastic ribbing on the inside of the unit.
First, I followed a Youtube video on disassembly:

The connector that burned up is mounted to a small PCB (printed circuit board). I removed the board completely, cut the plug-in connector off the wire harness, and soldered it to the new connector.
There is a 2nd smaller gauge electrical harness also connected to the board, which electrically connects to a metallic cylindrical device - which I could not positively identify the function of this part. I measured the metallic device with a meter and it showed no impedance at all, so this may be a temperature sensor.
I removed the small harness and the board, and kept it in the event that the unit complains at some point in time that it is missing. I can always mount it somewhere else and connect it back up. To clarify, in my unit the board and small harness is completely removed.
I increased mounting hole slightly to accommodate the new connector.
There are three harnesses that must be reconnected from the upper assembly down to the battery area. The front display area can be unclipped from the bottom section, and slid up enough for your hand to make the connections. There is white anti-vibration dried paste used on nearly all the plug connectors on the unit. Once disturbed the paste globs fall right off. I used a small amount of clear silicone when restoring these connections.
Let me know if you have any questions.
Thank you.
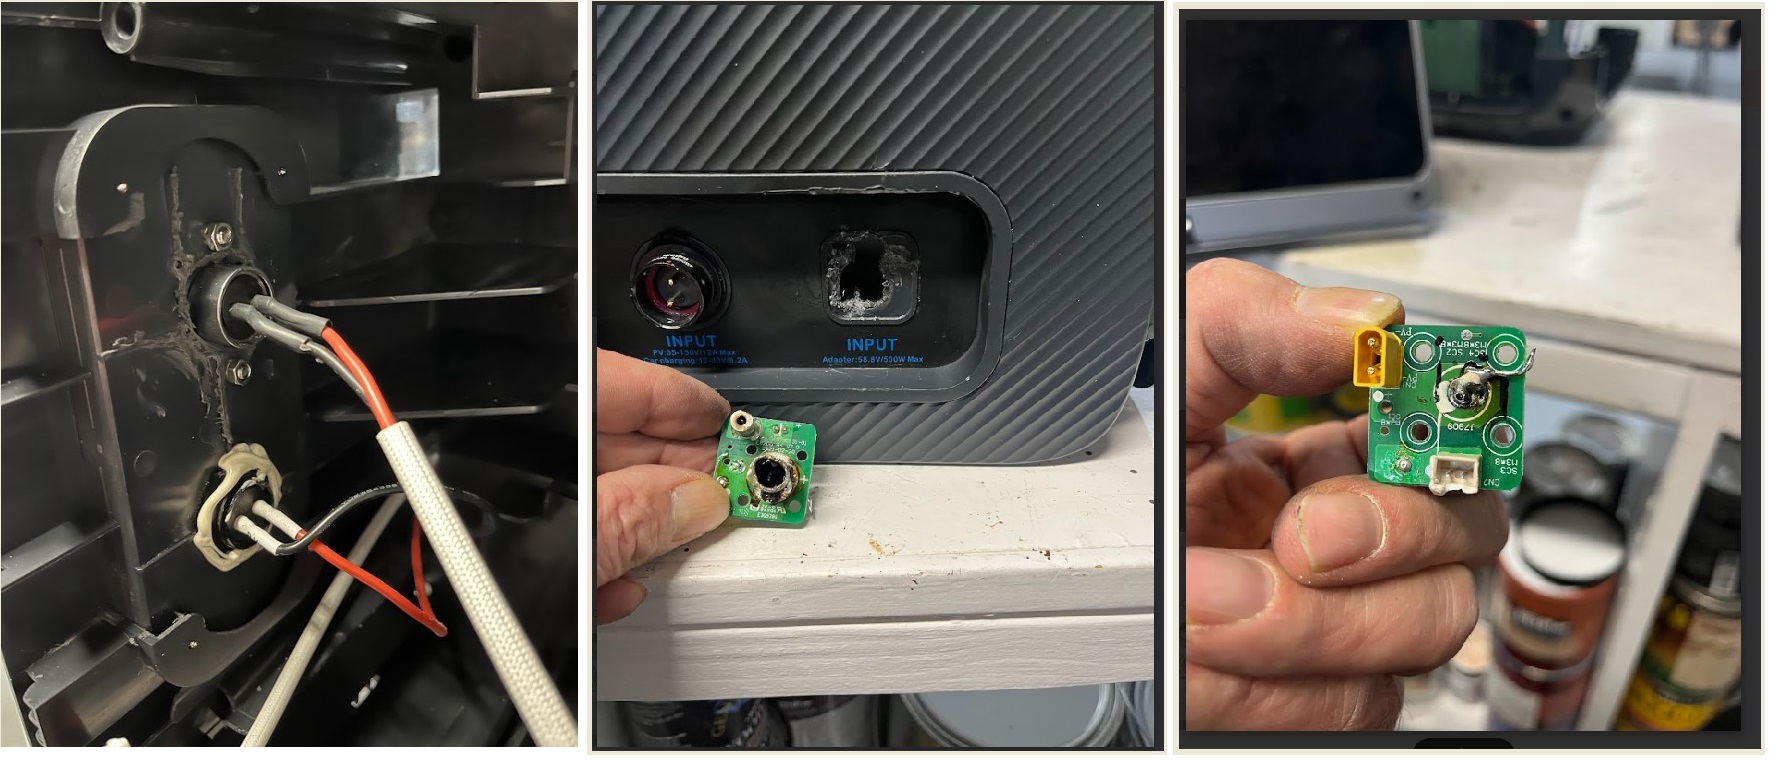
Here are photos I took of my unit. The above description is how I repaired my unit. In reality, you can see on the photo above that there are 4 small screws holding the connector panel in place. Just peel back the connector label, you should be able to back those screws out and make the repair from outside of the unit.
Unfortunately, by DC input jack also melted from the DO50S, though it never had more than 300W through the jack.
Bluetti is asking me to return this on my own cost. Is this normal? Since this is damage under warranty, this doesn’t seem reasonable, and it seems the company should be paying for the return – especially since i’ll be out of a unit for who knows how long.
What did you all do for warranty work, did you have to pay for shipping?
Hey @jCs
i think its not fair to ask you to return it on your own costs. When you buy it official from Bluetti and the damage is within the warranty, they dont need to provide you a shipping label, but from a customer stand point, it would be far better.
Maybe @BLUETTI_CARE can help you with you warranty case ![]()
greetings
Erik